For office heads who manage their office, staff and reports.
EZQueue · Main app
Office Admin Manual
For office heads who manage their office, staff and reports.
1Sign in
Sign in with your username and password to manage your office.
What this is for
You need to sign in before you can manage your office.
Before you start
Your username and password.
Access to your email, if this is a new computer.
Steps
Type your username in Username and your password in Password.
Tap Sign In.
If you see Two-Factor Authentication, type the 6-digit code from your email. On your own work computer, tick Remember this device for 30 days.
Tap Verify & Sign In. Office Overview opens.
If something goes wrong
No code in your email: wait a minute, then tap Resend verification code.
You forgot your password: the sign-in page says to contact the system administrator for a reset.
2Read the office overview
See your office's line, your stations and what needs attention.
What this is for
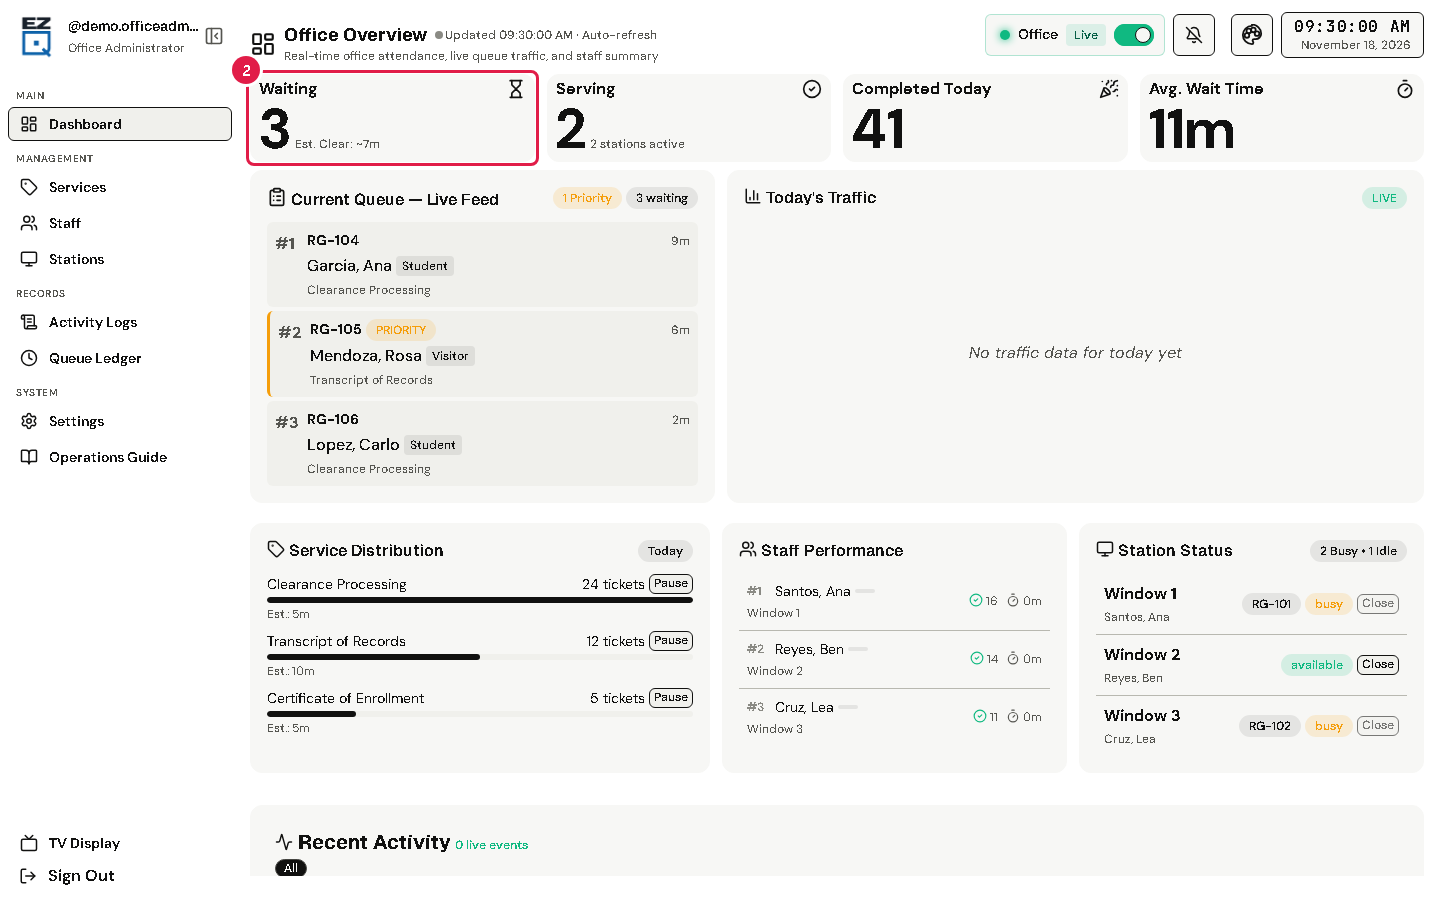
Office Overview is the first page after you sign in. It shows the line, the stations and the day's work for your office.
Before you start
You are signed in.
Steps
Tap Dashboard in the left menu.
Read the boxes at the top: Waiting, Serving, Completed Today and Avg. Wait Time. Point at a box, or tap it, to see more.
Read Needs Attention. It appears only when something needs you, for example tickets waiting over 30 minutes or an open station without staff. Its button takes you to the page that fixes it.
Current Queue — Live Feed lists waiting tickets. Tap a ticket to see its details.
Tip The Office chip at the top says Live (shown on kiosks) or Hidden (hidden from kiosks). Use its switch to change it. Only the office admin can change this.
If something goes wrong
The numbers look old: the page updates by itself. Check the update time next to the page title, and your internet connection.
3Add or change a service
Set up the services your office offers on the kiosk and remote portal.
What this is for
A service is something your office does, like a transcript request. Clients choose a service when they get a ticket.
Before you start
You are signed in as office admin.
Steps
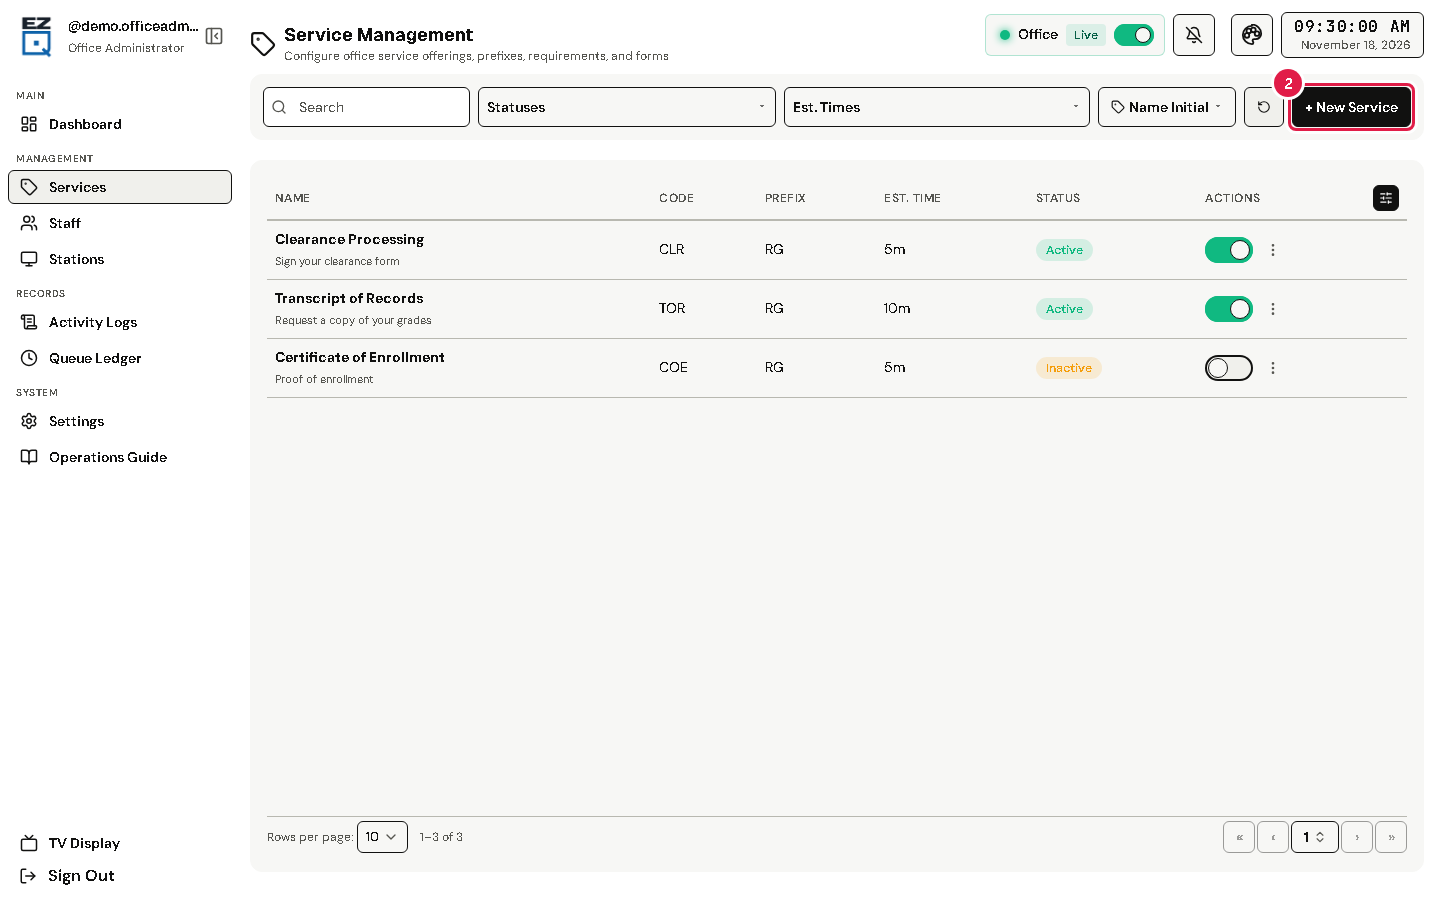
Tap Services in the left menu.
Tap New Service.
Fill in Service Name, Service Code, Prefix and Est. Minutes. These four are required (*).
Add a Description and the Service Reminders, Requirements & FAQs clients will see.
Tap Add.
To change a service later, open its actions menu (⋮), choose Edit, change the details, and tap Save.
To stop a service for now, turn off its status switch.
Warning Delete asks you to type the service name. The service is removed for good, but its old tickets are kept. If it has ticket history, it is turned off instead of deleted. The page suggests turning a service off instead of deleting it.
If something goes wrong
An error shows when you tap Add: read the message and check the required boxes (*).
4Add or change a staff account
Create accounts for your tellers and give them a station.
What this is for
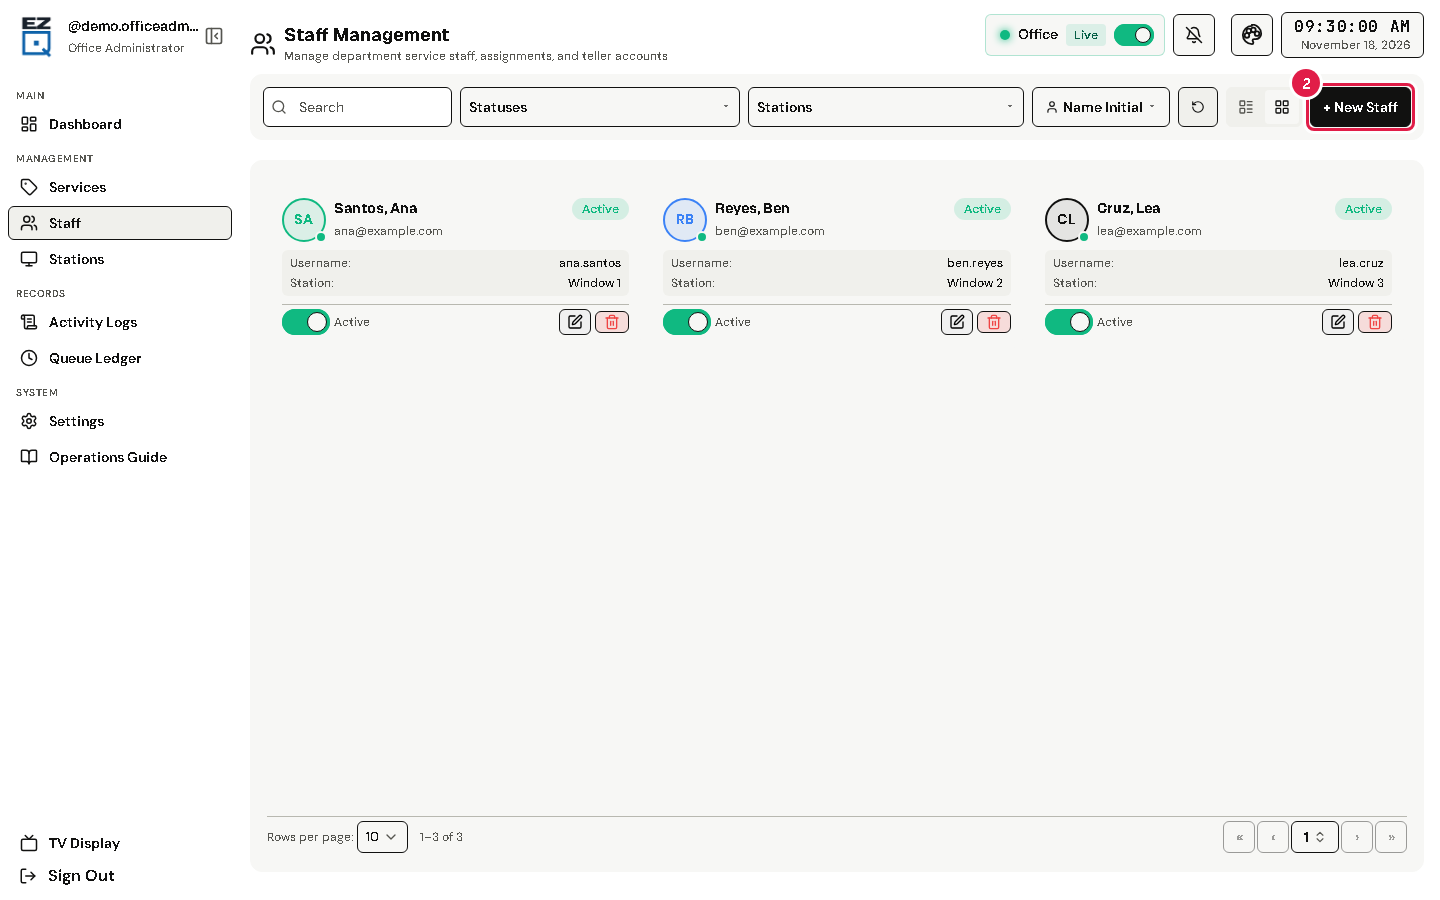
Each teller needs an account to sign in, and a station to call clients.
Fill in Full Name, Username, Email, Password and Confirm Password.
Choose the teller's Station, or leave — Not Assigned —.
Tap Add. The teller signs in with this username and password.
To change an account, open its actions menu (⋮) and choose Edit. Leave Password empty to keep the old one. Tap Save.
To stop an account for now, turn off its status switch.
WarningDelete asks you to type the name. The account is removed for good; its tickets and sessions are kept.
If something goes wrong
A teller sees "No active station assigned": edit their account and choose a Station.
5Add or change a station
Set up counters, and choose who works there and what they serve.
What this is for
A station is a counter or window, like "Window 3". The TV screen tells clients which station to go to.
Before you start
You are signed in as office admin.
Steps
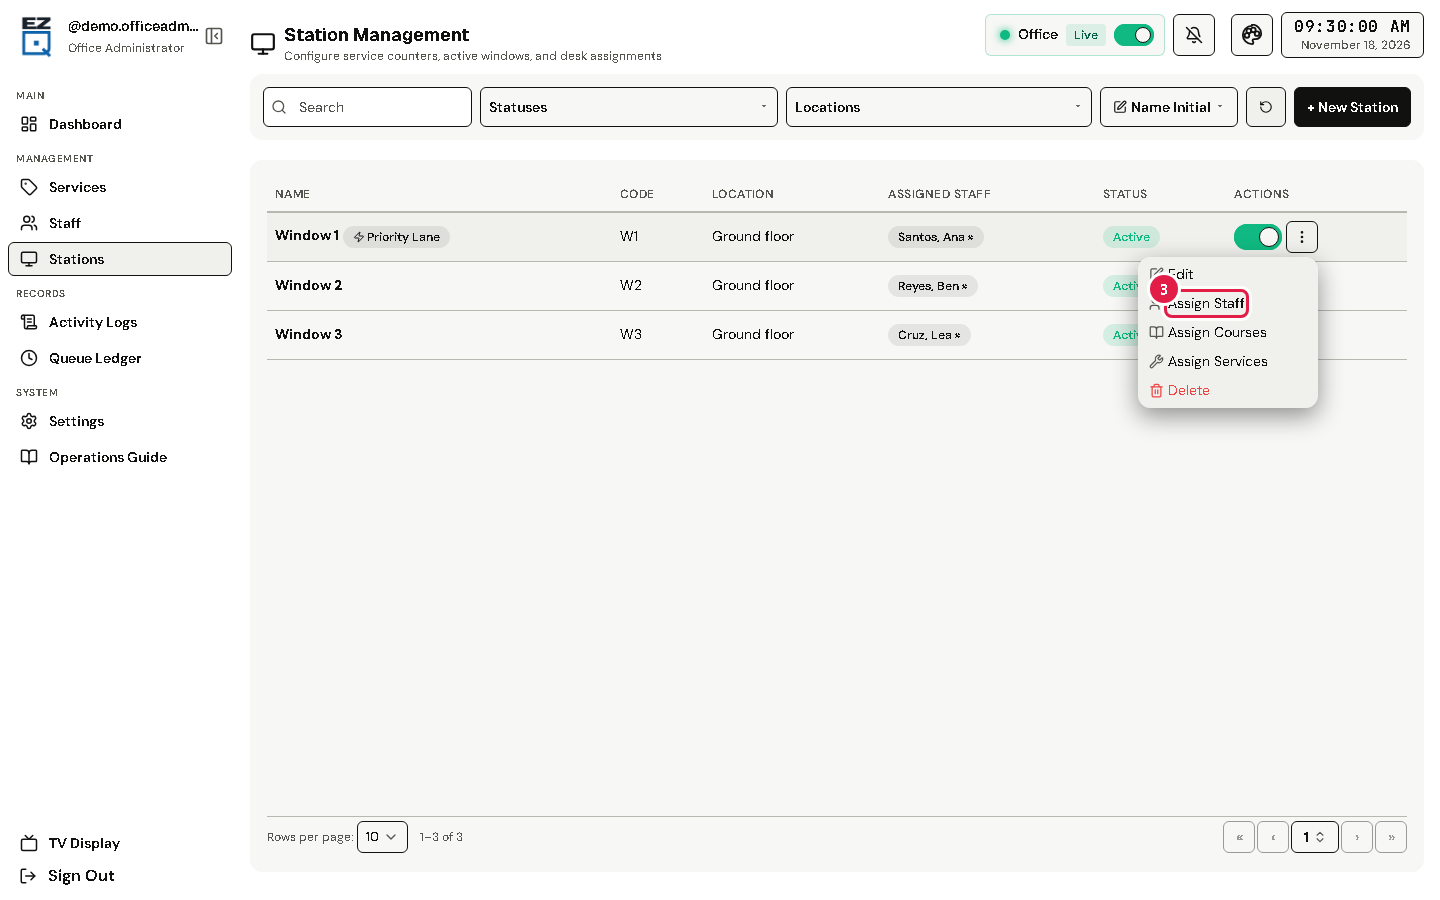
Tap Stations in the left menu.
Tap New Station. Fill in Station Name and Station Code, then tap Add.
To set up a station, open its actions menu (the ⋮ button, or right-click the row).
Choose Assign Staff and pick the teller in Select Staff.
Choose Assign Services to pick the services the station serves, then tap Save Services. Choose Assign Courses to pick its courses, then tap Save Assignments.
To stop a station for now, turn off its status switch.
Tip Turn on Priority Lane in a station's details to let its teller register priority clients at the counter. This also needs Enable priority queue on in Settings.
If something goes wrong
A teller is at the wrong station: in Assigned Staff, tap their name to unassign them, then assign them again.
6Look up past tickets
Search your office's ticket history and export it.
What this is for
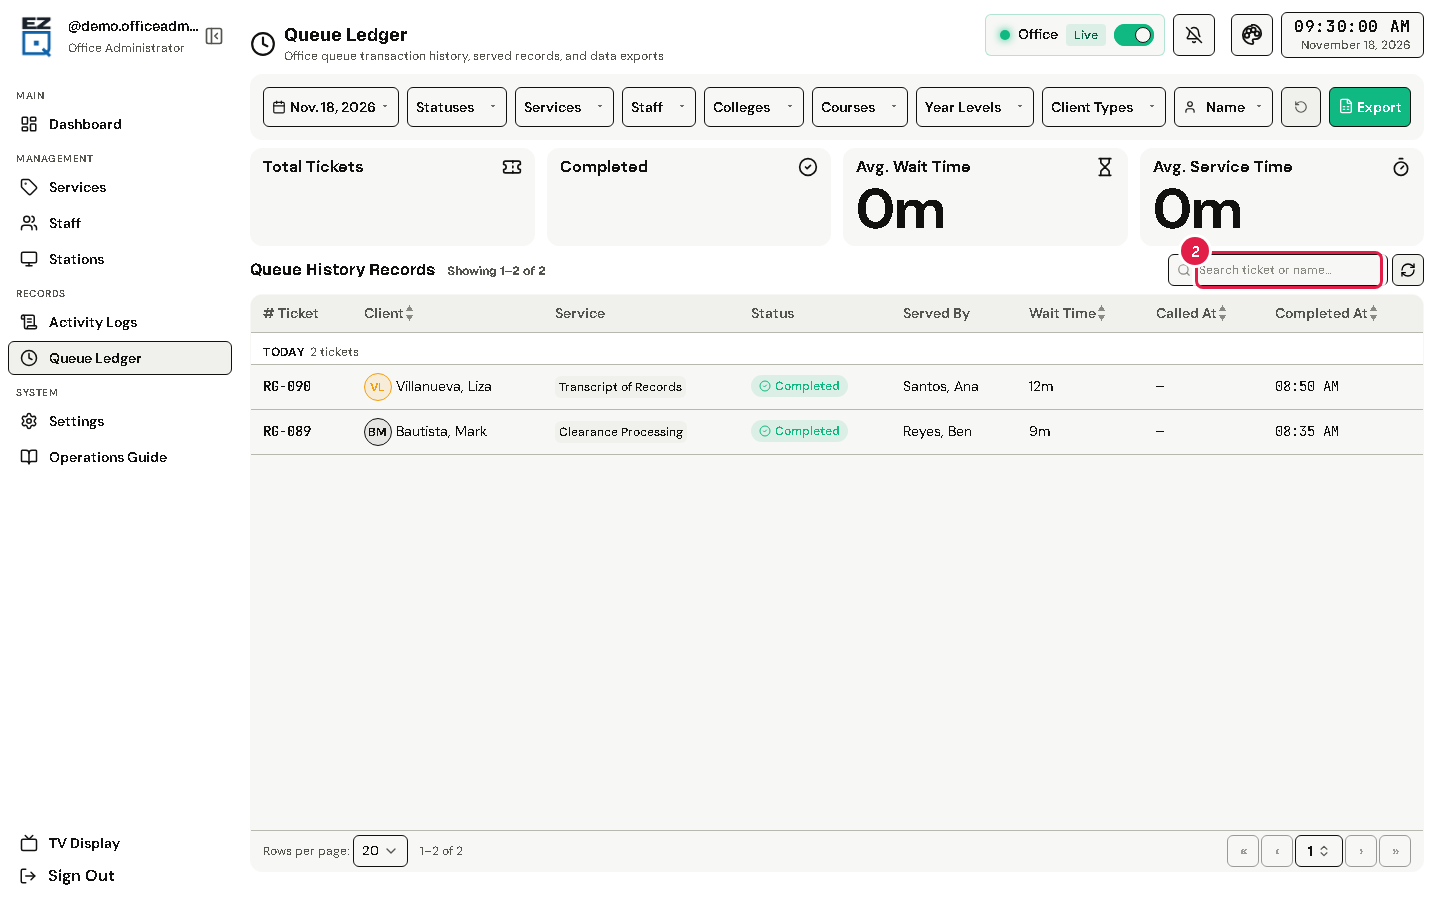
The Queue Ledger is your office's ticket history: served records you can filter, search and export.
Before you start
You are signed in as office admin.
Steps
Tap Queue Ledger in the left menu.
Type a ticket number or name in Search ticket or name….
To narrow the list, use the filters, for example Status, Service or Staff, and choose the dates.
Tap a ticket to see its details.
Tap Export. A preview opens, where you can download it as a PDF or print it.
If something goes wrong
The list is empty: tap Reset Filters and check the dates.
7Make a report
Create a traffic, service or staff report for your office.
What this is for
Department Reports sums up your office's work: traffic, wait times and performance.
Before you start
Reports is in your left menu. It shows only when a system admin turns on Enable System Reports View.
Steps
Tap Reports in the left menu.
Choose a Report Type: Queue Traffic Report, Service Report or Staff Performance.
Choose the dates. The report shows on the page.
Tap Export. The Document Builder opens, where you set up and save the report.
If something goes wrong
No Reports in the menu: ask a system admin to turn on Enable System Reports View in System Settings.
8Read the analytics
See charts of your office's queue, staff and peak hours.
What this is for
Real-time Analytics shows charts of your office's live numbers and trends.
Before you start
Analytics is in your left menu. It shows only when a system admin turns on Enable Analytics Dashboard.
Steps
Tap Analytics in the left menu.
Scroll through the charts, for example Staff Utilization, Peak Hour Heatmap and SLA Compliance.
To change how often the page updates, choose a Refresh Interval.
To save staff numbers, use Export Staff Performance.
If something goes wrong
No Analytics in the menu: ask a system admin to turn on Enable Analytics Dashboard in System Settings.
9Check the activity logs
See who did what in your office, and when.
What this is for
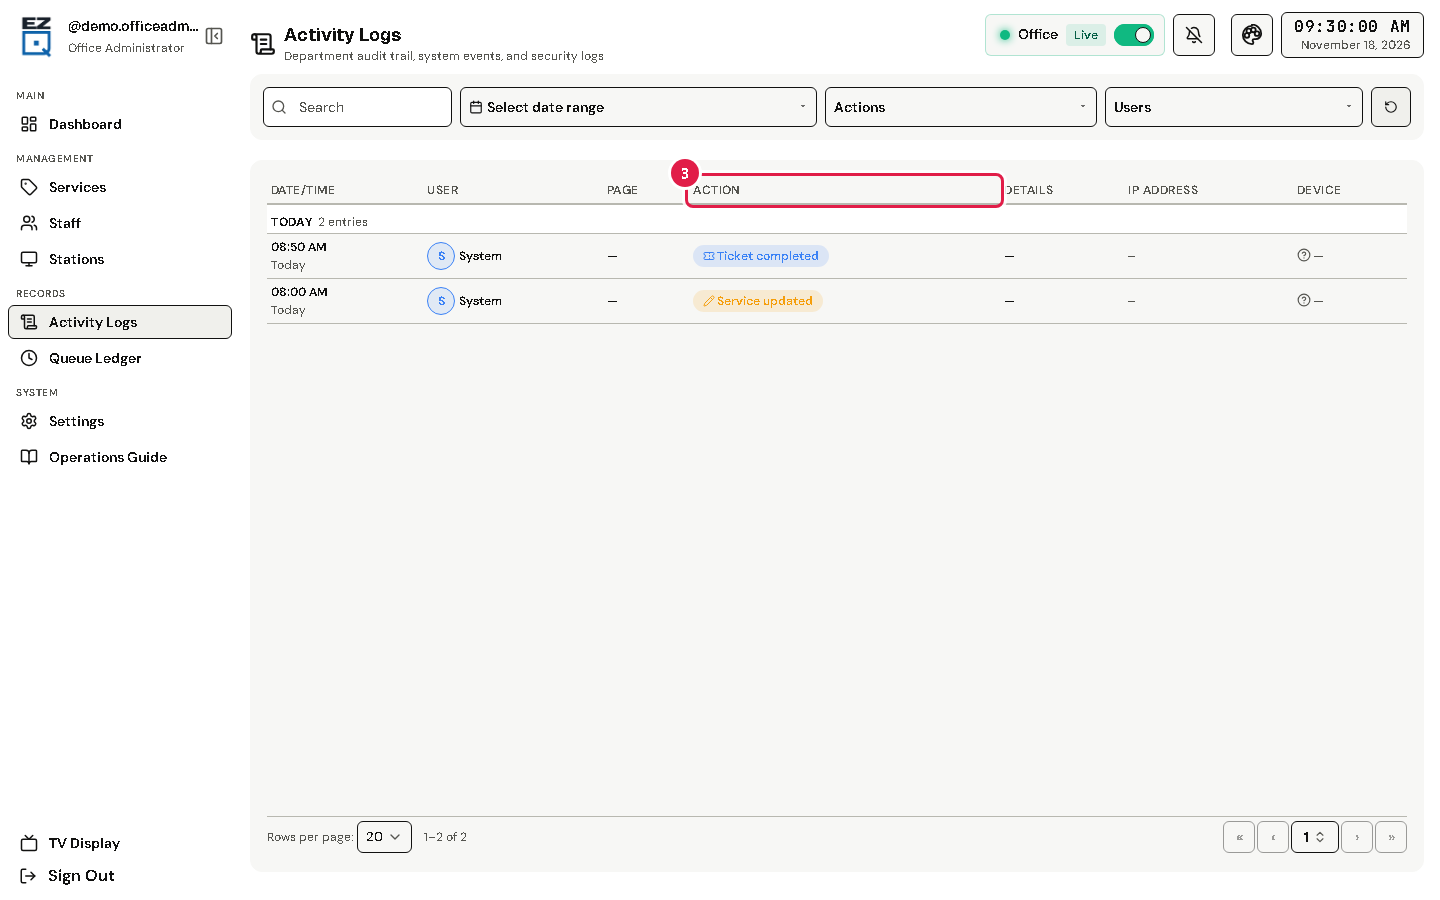
Activity Logs is your office's record of actions and system events.
Before you start
You are signed in as office admin.
Steps
Tap Activity Logs in the left menu.
Type in Search to find an action.
To narrow the list, choose an Action or a User.
If something goes wrong
The list is empty: tap Reset Filters.
10Read notifications
See system alerts and announcements for your office.
What this is for
Notifications collects system alerts, operational broadcasts and queue announcements.
Before you start
You are signed in as office admin.
Steps
Tap Notifications in the left menu.
Read the list. Use the filters to narrow it, and Reset Filters to clear them.
To remove a notification from the list, tap Dismiss.
11Change office settings
Set ticket limits, timers, priority rules and the TV display for your office.
What this is for
Office Settings controls how your office's line works.
Before you start
You are signed in as office admin.
Steps
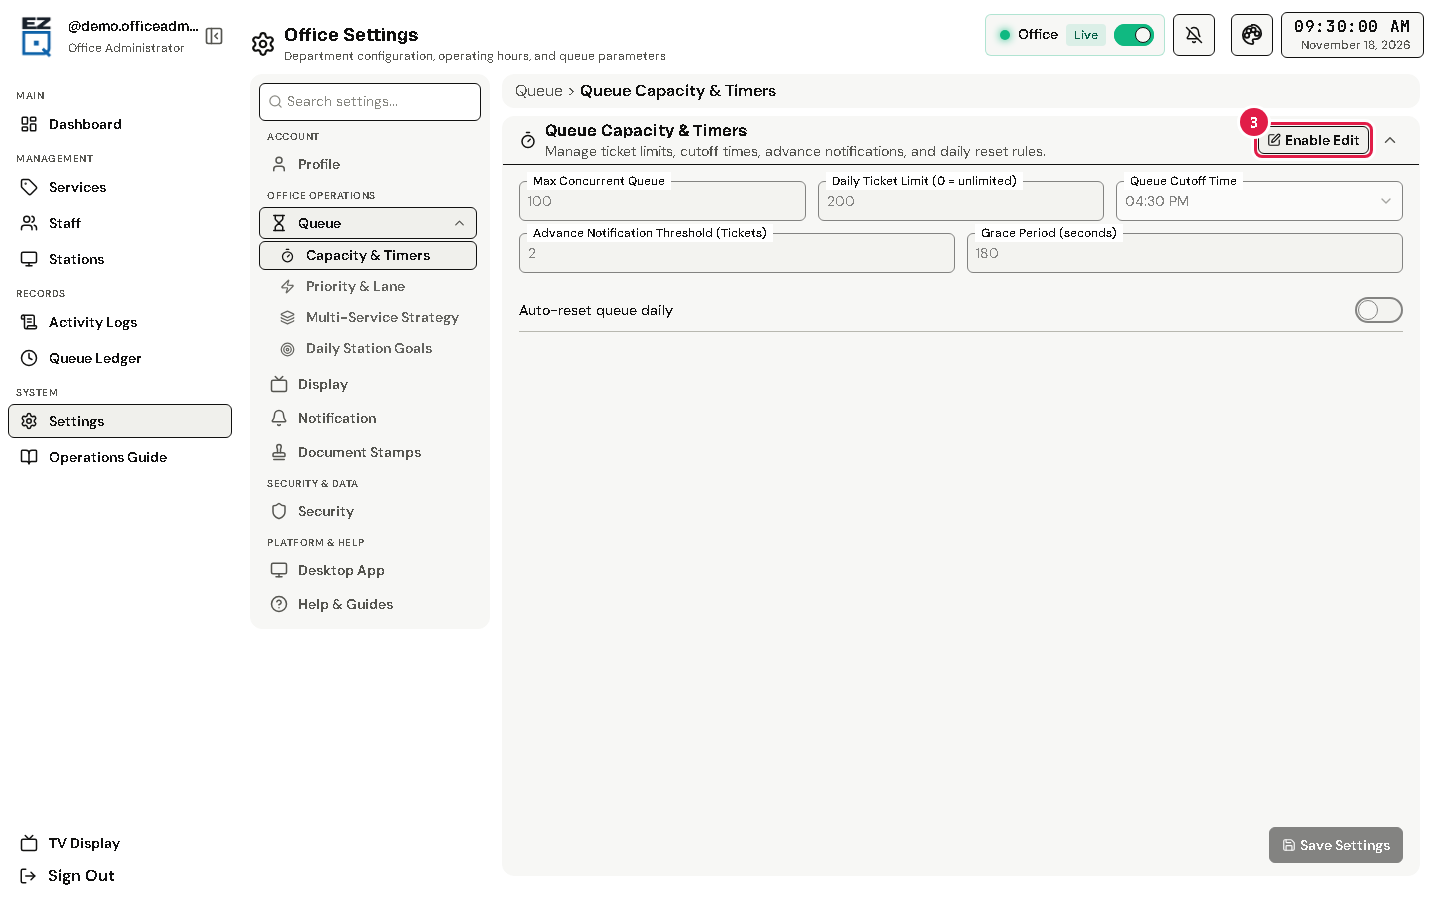
Tap Settings in the left menu.
In the list on the left, tap a section. For example, under Queue, tap Capacity & Timers.
Tap Enable Edit.
Change the values you need. For example:
Daily Ticket Limit (0 = unlimited) and Queue Cutoff Time.
Grace Period (seconds): how long a called client has to come. Then EZQueue moves the ticket to the end of the line.
Advance Notification Threshold (Tickets): clients this close to the front of a station's line get the "Your Turn is Approaching!" alert.
Tap Save Settings.
Tip Other sections include Priority & Priority Lane Rules, Display Configuration (TV and voice) and Security Settings, where you change your password.
If something goes wrong
Save Settings is grey: tap Enable Edit first.
You cannot change your office: the page says the office cannot be changed; contact the system administrator.