For IT and system admins who set up offices, users and settings.
EZQueue · Main app
System Admin Manual
For IT and system admins who set up offices, users and settings.
1Sign in
Sign in with your username and password to manage the whole system.
What this is for
You need to sign in before you can manage EZQueue.
Before you start
Your username and password.
Access to your email, if this is a new computer.
Steps
Type your username in Username and your password in Password.
Tap Sign In.
If you see Two-Factor Authentication, type the 6-digit code from your email. On your own work computer, tick Remember this device for 30 days.
Tap Verify & Sign In. System Overview opens.
If something goes wrong
No code in your email: wait a minute, then tap Resend verification code.
2Read the system overview
See all offices, users, stations and today's queues in one place.
What this is for
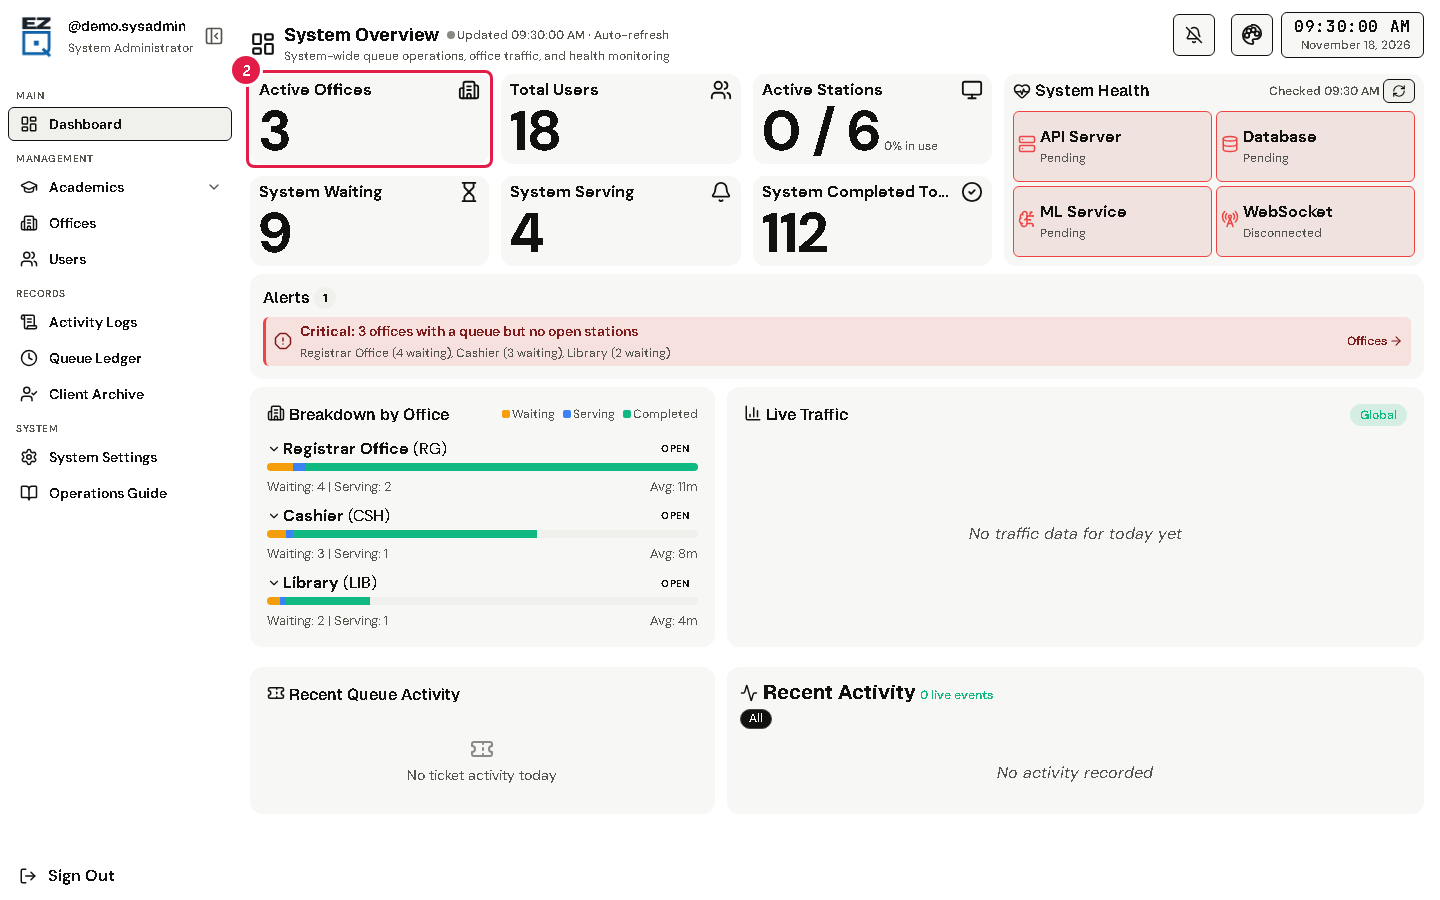
System Overview shows queue work across all offices, office traffic and system health.
Before you start
You are signed in as a system admin or IT admin.
Steps
Tap Dashboard in the left menu.
Read the boxes at the top, for example Active Offices, Total Users, System Waiting and System Completed Today. Point at a box, or tap it, to see the numbers by office or by role.
Check Alerts for anything that needs you.
Breakdown by Office shows each office's load. Live Traffic shows a chart of ticket traffic.
To check the system health again, tap Refresh system health.
3Add or change an office
Set up the offices that give tickets, like the Registrar or the Cashier.
What this is for
Each office has its own line, services, staff and stations.
Before you start
You are signed in as a system admin or IT admin.
Steps
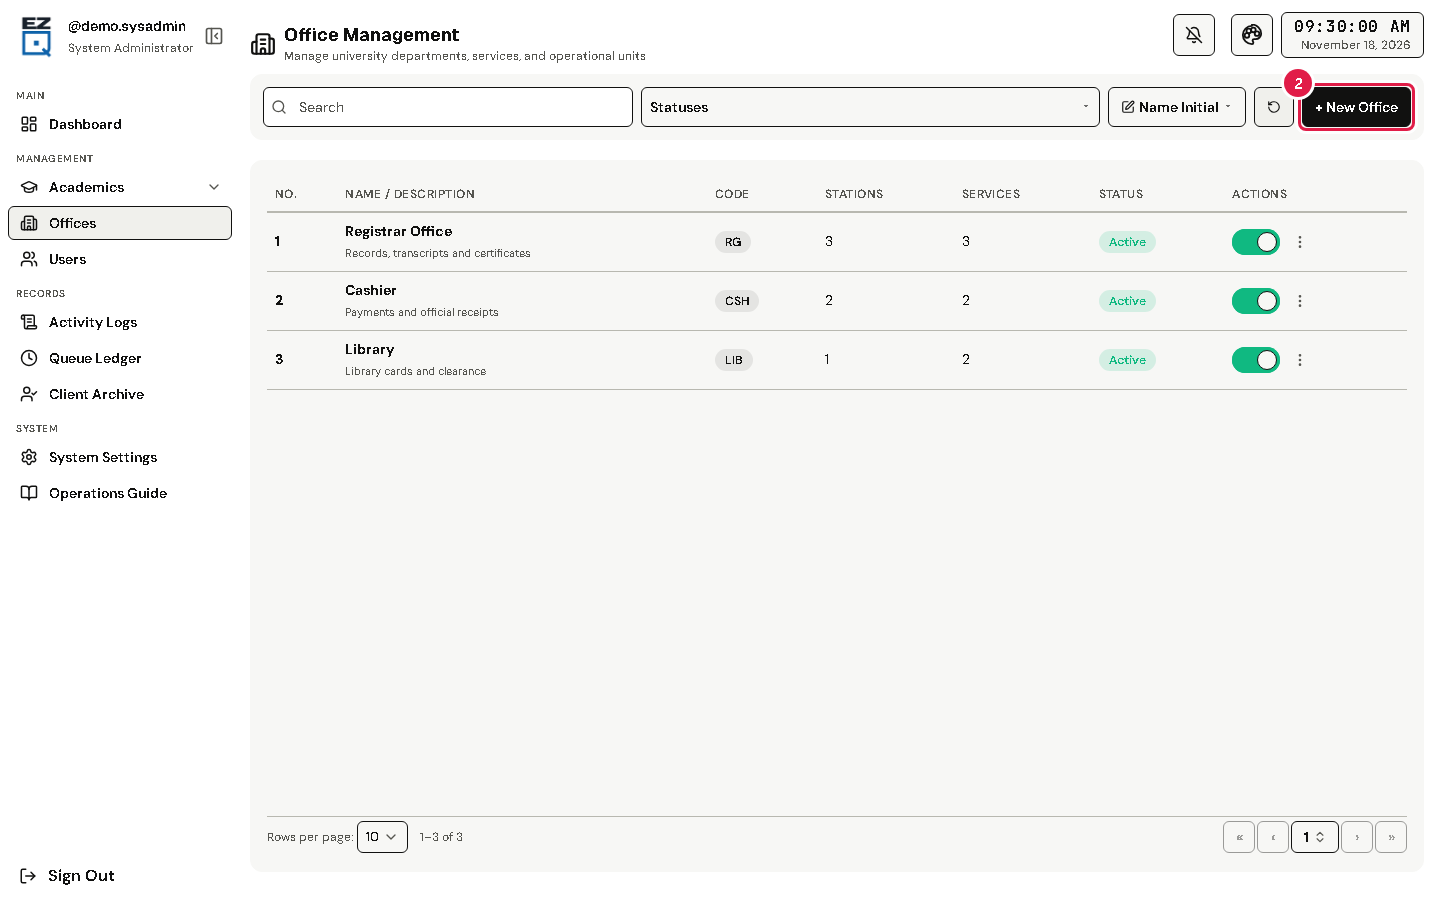
Tap Offices in the left menu.
Tap New Office.
Fill in Office Name and Office Code (both required), and a Description.
Tap Add.
To change an office, open its actions menu (⋮) and choose Edit. Choose Details to see it, with its assigned staff.
To stop an office for now, turn off its status switch.
WarningDelete asks you to type the office name before it removes the office.
If something goes wrong
An error shows when you tap Add: read the message and check the required boxes (*).
4Add or change a user
Create accounts for admins and staff, and choose their role and office.
What this is for
Everyone who signs in needs an account. The role decides what they can do.
Before you start
You are signed in as a system admin or IT admin.
Steps
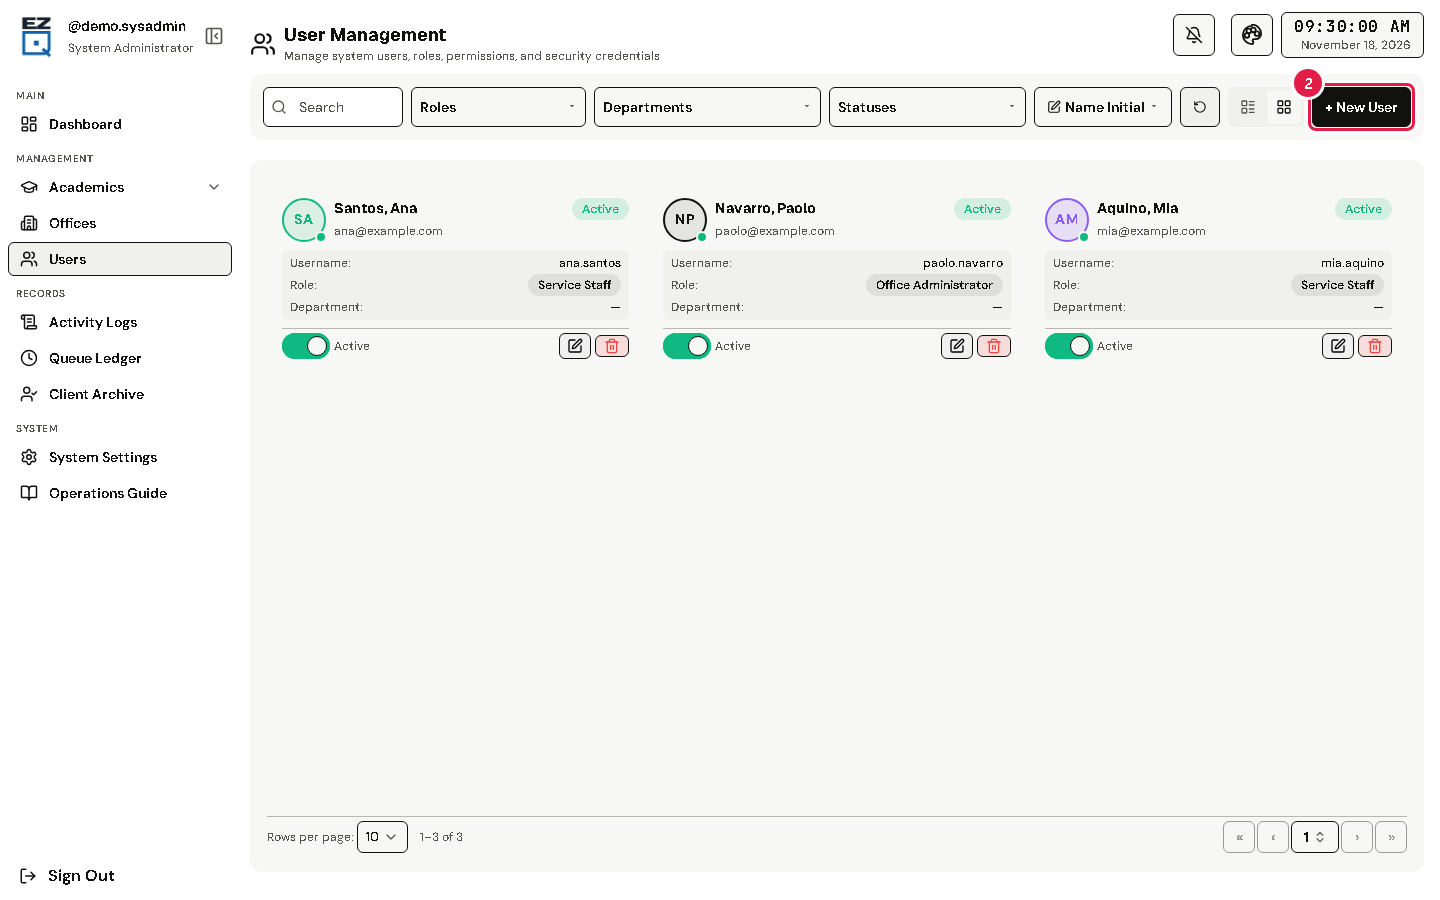
Tap Users in the left menu.
Tap New User.
Fill in Full Name, Username, Email and Password.
Choose a Role, for example Office Administrator or Service Staff.
For office roles, choose the Department. For Service Staff, also choose the window. System and IT admins have no department.
Tap Add.
To change a user, open the actions menu (⋮) and choose Edit. Leave the password empty to keep it.
To stop an account for now, turn off its status switch.
WarningDelete removes the account for good. Its tickets and sessions are kept.
If something goes wrong
No windows to choose: the window list shows "— No windows configured for this office —". Add stations for that office first.
5Set up academic years
Add school years and semesters with their start and end dates.
What this is for
Academic Years lists school years and semesters with their active dates.
Before you start
You are signed in as a system admin or IT admin.
Steps
In the left menu, open Academics and tap Academic Years.
Tap New Academic Year.
Fill in Name, Semester, Start Date and End Date. All are required.
Tap Add.
Warning Deleting asks you to type the name in Type name here to confirm.
6Set up subjects
Add the subjects used in EZQueue.
What this is for
Subjects lists subjects. The page describes it as the place to manage subjects and link them to programs.
Before you start
You are signed in as a system admin or IT admin.
Steps
In the left menu, open Academics and tap Subjects.
Tap New Subject.
Fill in Subject Code and Subject Name. Both are required.
Tap Add.
Tip Use Search Subjects and the Program filter to find a subject.
Warning Deleting asks you to type the name in Type name here to confirm.
7Set up colleges
Add the colleges that students choose when they get a ticket.
What this is for
Colleges & Faculties lists colleges and their codes.
Before you start
You are signed in as a system admin or IT admin.
Steps
In the left menu, open Academics and tap Colleges.
Tap New College.
Fill in College Code and College Name. Location, description and dean details are optional.
Tap Add.
Warning Deleting asks you to type the name in Type name here to confirm.
Tip A college that was turned off can be turned on again with Reactivate College.
8Set up programs
Add degree programs and their majors.
What this is for
Programs & Degrees lists the courses students choose on the kiosk and remote portal.
In the left menu, open Academics and tap Programs.
Tap New Course.
Fill in Course Code and Course Name.
Optional: type the majors in Majors / Specializations, separated by commas, and choose the College Assignment.
Tap Add.
Warning Deleting asks you to type the name in Type name here to confirm.
9Look up tickets in all offices
Search the ticket history of every office and export it.
What this is for
The Global Queue Ledger is the ticket history of all offices.
Before you start
You are signed in as a system admin or IT admin.
Steps
Tap Queue Ledger in the left menu.
Type a ticket number or name in Search ticket or name….
To narrow the list, use the filters, for example Office, Status or Service.
Tap a ticket to see its details.
Tap Export. A preview opens, where you can download it as a PDF or print it.
If something goes wrong
The list is empty: tap Reset Filters.
10Find a client's records
Look up a client's details and their ticket history.
What this is for
Client Profile Archive keeps client records, IDs and ticket history.
Before you start
You are signed in as a system admin or IT admin.
Steps
Tap Client Archive in the left menu.
Type a name or ID in Search name or ID…. You can also filter by Role, College or Course.
Tap a client to open Client Profile & Ticket History.
If something goes wrong
"No Client Profiles Found": check the spelling, or tap Reset Filters.
11Check the system logs
See actions, sign-ins and security events across the system.
What this is for
System Logs is the record of actions, sign-ins and security events in all offices.
Before you start
You are signed in as a system admin or IT admin.
Steps
Tap Activity Logs in the left menu.
Type in Search, or filter by Office, User or Action.
Tap Reset Filters to see everything again.
12Read notifications
See system alerts and announcements.
What this is for
Notifications collects system alerts, operational broadcasts and queue announcements.
Steps
Tap Notifications in the left menu.
Read the list. Use the filters to narrow it, and Reset Filters to clear them.
To remove a notification from the list, tap Dismiss.
13Make a system-wide report
Create traffic, service or staff reports for all offices or one office.
What this is for
System-Wide Reports sums up work across offices.
Before you start
System Reports is in your left menu only when Enable System Reports View is on in System Settings > Beta Features.
Steps
Tap System Reports in the left menu.
Choose a Report Type: Queue Traffic Report, Service Report or Staff Performance.
To see one office, choose it in Filter by Office.
Tap Export. The Document Builder opens, where you set up and save the report.
14Send reports by email on a schedule
Set up reports that EZQueue makes and emails by itself.
What this is for
Automated Report Schedules emails reports at set times.
Before you start
Scheduled Reports is in your left menu only when Enable System Reports View is on.
Steps
Tap Scheduled Reports in the left menu.
Tap Create Schedule.
Choose the Format, the Reports to Include and the Date Range Filter.
Set when it runs. The time box uses the form "minute hour day month weekday", for example 0 9 * * 1.
Type the email addresses that get the report.
Tap Create Schedule.
In the list, the actions menu has Run Now, Preview PDF Report, Edit and Delete.
15Read the system-wide analytics
See charts of all offices, staff and peak hours.
What this is for
System-Wide Analytics shows campus-wide queue charts and office insights.
Before you start
System Analytics is in your left menu only when Enable Analytics Dashboard is on in System Settings > Beta Features.
Steps
Tap System Analytics in the left menu.
Scroll through the charts, for example Office Performance Heatmap, Peak Hour Heatmap and SLA Compliance.
To change how often the page updates, choose a Refresh Interval.
To save office numbers, use Export Office Performance.
16Read the forecasts
See predicted ticket numbers, busy days and unusual patterns.
What this is for
Predictive Forecasting shows traffic forecasts and staffing suggestions made by machine learning.
Before you start
Forecasting is in your left menu only when Enable Machine Learning Forecasting is on in System Settings > Beta Features.
Steps
Tap Forecasting in the left menu.
Choose an Office and the number of Forecast Days.
Read the boxes: Total Predicted Tickets, Peak Day, Anomalies Detected and High Priority Actions.
Scroll to Demand Forecast, Anomaly Detection and Recommendations.
17Change system settings
Open or close the system, turn features on or off, and set queue rules for everyone.
What this is for
System Configuration controls EZQueue for every office.
Before you start
You are signed in as a system admin or IT admin.
Steps
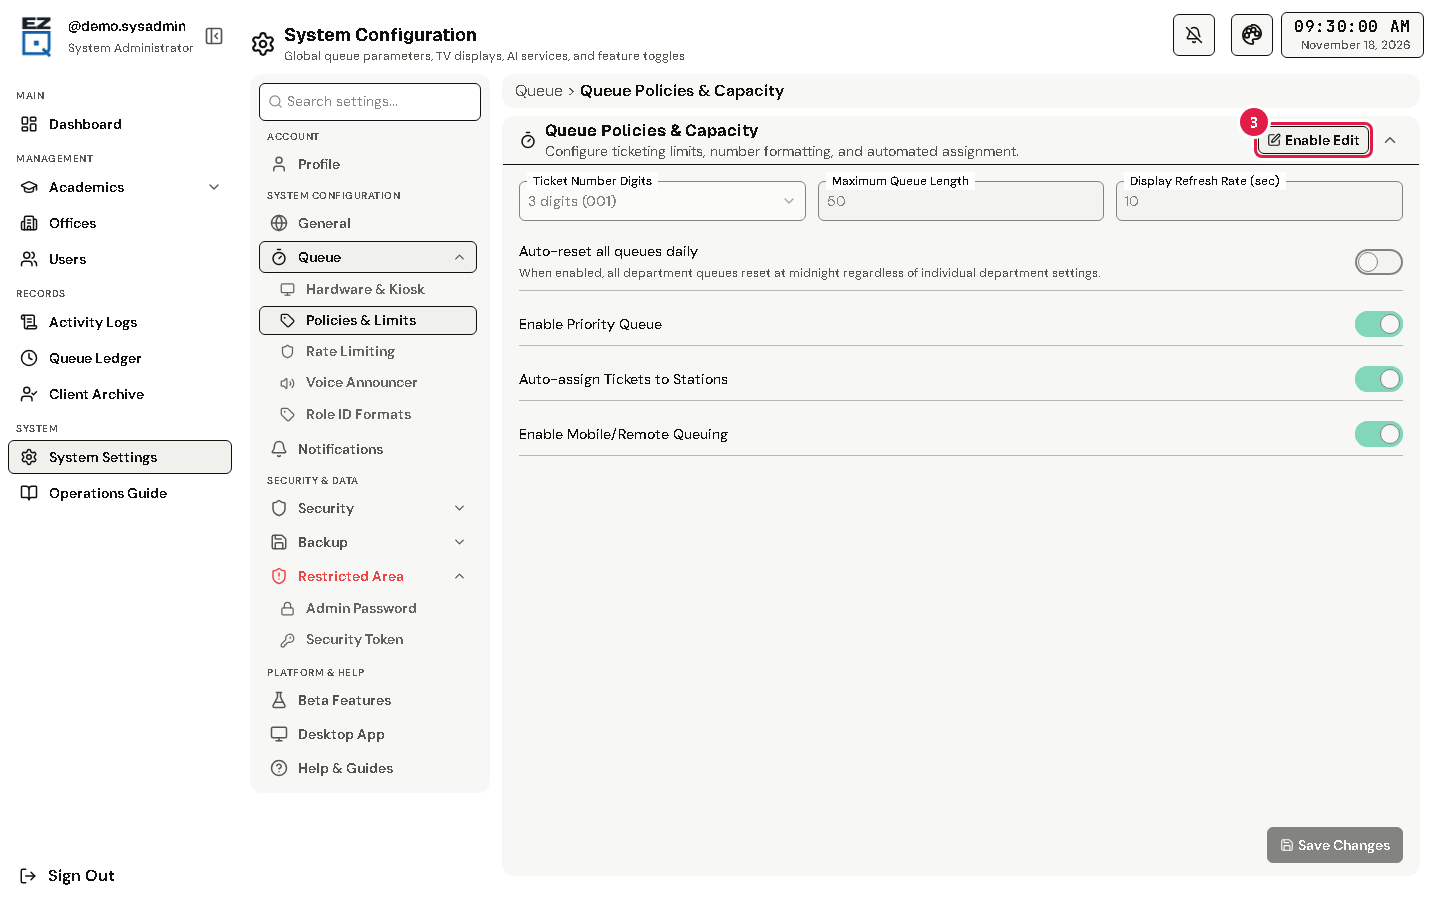
Tap System Settings in the left menu. System Configuration opens.
In the list on the left, tap a section. For example, under Queue, tap Policies & Limits.
Tap Enable Edit, change the values, then tap the save button at the bottom of the section.
Settings you may need:
Queue > Hardware & Kiosk (Operational Status & Hardware): System Status and Kiosk Active. When the system is closed or under maintenance, kiosks and the remote portal show a message and give no tickets.
Queue > Policies & Limits (Queue Policies & Capacity): Enable Mobile/Remote Queuing (getting tickets by phone) and Enable Priority Queue.
Beta Features: Enable Analytics Dashboard, Enable System Reports View and Enable Machine Learning Forecasting. Each adds its page to the menu.
Tip Other sections include Rate Limiting & Abuse Prevention, Voice Announcer (Kokoro TTS) and Security Settings.